Run-Out and Repeat Accuracy
Clamping accuracy & repeat accuracy
The importance of clamping accuracy and repeatability is almost second only to handle accuracy or dynamic balance.
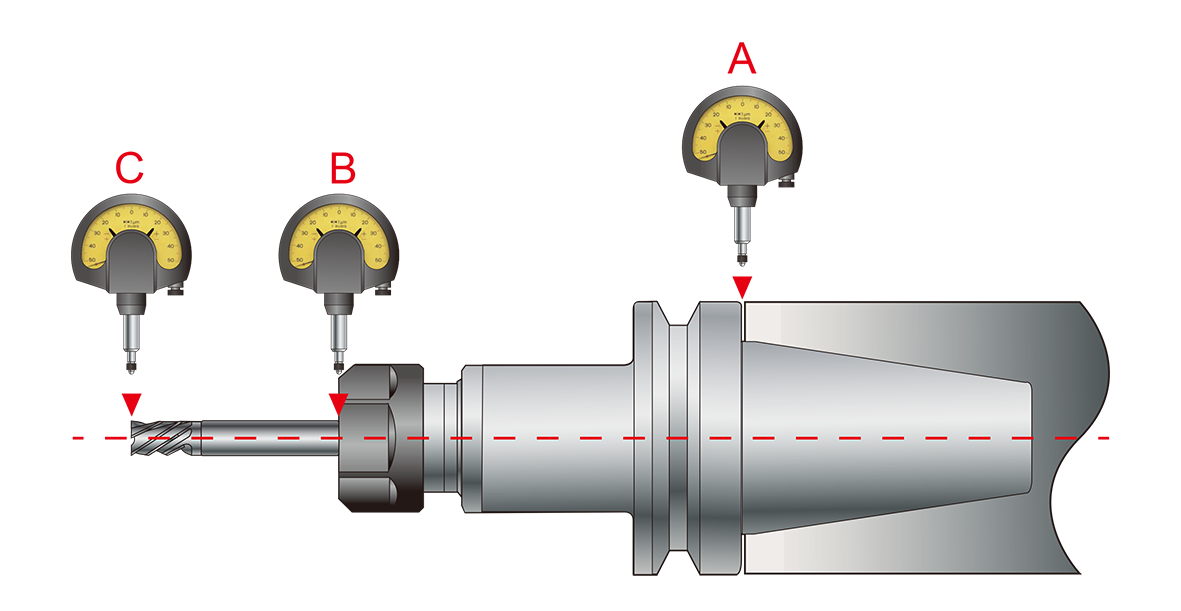
Tool holder clamping accuracy refers to the deflection of the tool holder after clamping the tool. The measurement method is to rotate the test rod by 360 degrees at a position several times the length of the shank diameter after clamping the test rod and measure its deflection. As shown in the figure, the tool holder clamps the test rod and fixes it on the measuring tool. Using point A as the reference point, rotate 360 degrees to measure the deflection at point B or point C. The distance between the nose of the tool holder (point B) and point C is expressed as several times the tool holder diameter (assuming that the tool holder diameter ∅d is 6mm, and the 4 times length/4d is 24mm). The repeatability of the tool holder refers to the change in the clamping accuracy of each measurement under the condition of repeated disassembly or clamping of the tool holder. The longer the distance between point C, the more difficult it is to maintain the clamping accuracy and repeatability.

Generally speaking, the length is mainly from 2.5 times to 4 times according to the manufacturer's manufacturing quality. When choosing a tool holder, the user should pay attention to the fact that the accuracy indicated by the manufacturer is the clamping accuracy or repeatability and whether the measurement point is only in the inner hole of the tool holder (end B) or 2.5d, 3d or 4d.
The importance of clamping accuracy and repeatability
Ensure the surface roughness and machining accuracy of the workpiece
The higher the clamping accuracy, the smaller the tool swing at the end, and therefore the user can easily achieve the required accuracy or surface roughness of the workpiece. As shown in the figure below (ER collet VS hydraulic clamping), the higher the clamping accuracy of the tool holder, the roughness of the workpiece surface is obviously better than the tool holder with low clamping accuracy. In addition, poor clamping accuracy will also cause problems such as reaming, poor surface accuracy, and poor roundness.

Saving of processing time
As mentioned above, the number of inspections due to low clamping accuracy and the rework time due to unqualified accuracy/surface roughness can also be greatly reduced. In addition, the use of high-repetition precision tool holders can also greatly reduce the precious time spent by machine operators for correcting tools.
In an environment where selling prices and profits are plummeting or the production capacity is overloaded, assuming that the cost of machine processing personnel per minute is 10 yuan, the cost of wasted in heavy industry or calibration knife at least 500 yuan a day. The benefits of a tool holder with high clamping accuracy and repeatability are far greater than the price of the tool holder itself.
Protect and extend tool life
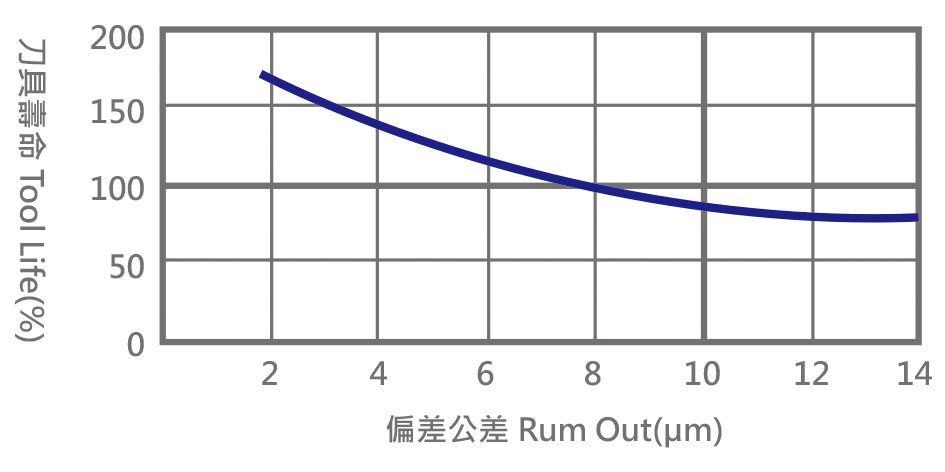
Each edge of the tool can be uniformly stressed and worn due to the high clamping accuracy, that is, the deflection of the end of the sentence is small, and it will not cause abnormal and excessive wear due to uneven force on a single blade due to the deflection. This leads to early shortening of tool life. As shown in the following comparison table of tool holder accuracy and tool life, based on the clamping accuracy of 0.01mm, when the accuracy is increased to 0.003mm, the tool life can be extended by more than 50%.

PARFAITE recommends that in addition to purchasing a tool holder with sufficient clamping force, a tool with a shank tolerance of h6 or higher should be selected to ensure the realization and maintenance of the overall clamping force.


